Bed Sag
- Thread starter juliatruchsess
- Start date
The original gMax design included (4) aluminum angles for the bed frame. (2) were for the bottom and (2) were for the top (just at the underside of the acrylic bed). It was decided to remove two of the angles (the ones interacting with the bed acrylic) since they acted as heatsinks removing heat from the printed parts causing some slight curling (or so we think). We can easily add these aluminum angles back in to account for any bed sagging or they can be purchased any any major hardware store like Home Depot. This was our original intent.
What are your thoughts?
What are your thoughts?
Hi Gordon,
Do you have a photo or drawing of where the additional angles went? I'm not quite clear from your description.
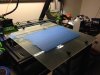
So far for me, the gMax is, rather astoundingly, able to do a pretty good job despite the sag. I've never used a .5mm nozzle before and haven't done much with Colorfabb, but the combo seems to be able to lay down enough plastic in the first layer to compensate for the lack of level. Nonetheless I'm interested in getting it flatter and was (before your mention of heat sinking issues anyway) thinking of replacing the acrylic with glass, of putting glass under the acrylic.
Thanks,
Julia
Do you have a photo or drawing of where the additional angles went? I'm not quite clear from your description.
So far for me, the gMax is, rather astoundingly, able to do a pretty good job despite the sag. I've never used a .5mm nozzle before and haven't done much with Colorfabb, but the combo seems to be able to lay down enough plastic in the first layer to compensate for the lack of level. Nonetheless I'm interested in getting it flatter and was (before your mention of heat sinking issues anyway) thinking of replacing the acrylic with glass, of putting glass under the acrylic.
Thanks,
Julia
Hi, my bed also had a bend in it, it is not as big as Julia's bend, however a bend is a bend and it does frustrate me. I have so far managed to get away with it as I have not been printing huge objects across the bed, however I am working on bigger prints piece by piece ( so far longest print 12hrs 40 min ) and when I get there I don't want to have issues that a bent bed will cause.
Gordon's solution of having the extra angles as per early versions will not help as that will only solve the issue on the Y axis, where the bend I have and the one Julia has had is on the X axis. It really needs support on the X & Y axis.
I like the idea of having the acrylic top as supplied is simple and so far except for one print I have not had any trouble with items lifting from the bed. I have contemplated 2 options to sort the bed sag, lay a piece of aluminium / glass underneath the Perspex and force it flat, or just permanently change the bed to glass. Has anyone had any experience of printing on glass with PLA???? I don't want to have to go down the route of having to heat the bed or tape the bed or any other options if I can help it, I like the current scuff, wipe and print that you get with the Perspex. Is it worth going for a thicker section of Perspex???? If so what is the best grade of Perspex???? Any ideas / suggestions would be helpful.
Rowan
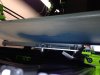
Actually the bow I'm showing in my photo is along the Y axis, which has a larger unsupported span than the X axis due to the locations of the screws. I've bought some aluminum angle stock but haven't installed the upper rails yet; I have a feeling that that will be good enough for most of what I need to do with this printer, but a glass plate would be my fallback solution, preferably by itself but with acrylic on top of it if adhesion to glass proves problematic. I wouldn't want to go to thicker acrylic, as the bed is quite massive already; more mass would mean the motion control would have to be slowed further in order to control it.
I'm assuming that 3/16" glass would be stiffer yet no heavier than the 1/4" acrylic, but that's just a guess.
julia
I'm assuming that 3/16" glass would be stiffer yet no heavier than the 1/4" acrylic, but that's just a guess.
julia
If the double angle design along the center of the bed was acting slightly like a heat sink, there might be room to bolt aluminum angles around the perimeter of the printing bed like a picture frame. Heat sinking might only be an issue if you're printing at the extremes of the machine. I don't know if it would make it too stiff or heavy or conform to any bends in the extruded angles though.
I did the double aluminum angle thing. Bed sag is reduced but not eliminated. I probably should have offset the angles from one another somehow to allow greater leveler adjustment range without reducing Z printing range (duh, back to the hardware store again).
The other thing about the current bed arrangement I really don't like is that if your print doesn't come off easily (and Colorfabb sticks to the acrylic like, um, glue) then you have to remove the whole dang bed (i.e. unscrew all four leveling screws) after every print and then reattach, re-level it, and re-calibrate the Z-stop for the next print. I don't like using a lot of force to get prints off with the bed attached to the printer. I want to design a platform that can be easily put on or taken off without disrupting the whole leveling system. The Up uses bulldog clips, the Zortrax has magnetic plates...
The other thing about the current bed arrangement I really don't like is that if your print doesn't come off easily (and Colorfabb sticks to the acrylic like, um, glue) then you have to remove the whole dang bed (i.e. unscrew all four leveling screws) after every print and then reattach, re-level it, and re-calibrate the Z-stop for the next print. I don't like using a lot of force to get prints off with the bed attached to the printer. I want to design a platform that can be easily put on or taken off without disrupting the whole leveling system. The Up uses bulldog clips, the Zortrax has magnetic plates...
Attachments
-
 70.6 KB Views: 3,456
 -
 79.9 KB Views: 3,456
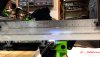
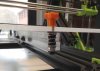
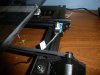
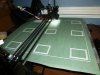
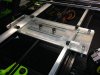
Not enough time tonight to explain everything, but I also had difficulty with a sagging bed, and after trying a couple of different options, I purchased a 1/2" thick piece of polycarbonate (Lexan) and replaced the original bed that came with the unit.
Here's a few photos. I think I am going to use a router and lighten the bed on the bottom side a bit next weekend, but overall it performed absolutely great and gave consistent results.
I ended up buying a 36" piece of 1/2 x 3/4 x 1/16 aluminum angle and replacing the original support angles, but it is probably possible to do the change over with buying new angle.
I also relocated the y-axis endtop switch and shifted the aluminum angles out over the v-wheels. I'll try to explain my reasons for relocating the angles in another (later) post.
Rick Palmer
Attachments
-
 207 KB Views: 3,431
 -
 175.6 KB Views: 3,432
 -
 176.7 KB Views: 3,432
raykholo said:
Julia, do you want to try using binder clips to attach a thin acrylic sheet to the 3/16" glass you referred to?
")
Well I've got parts coming in Friday and should have all other shipments soon. Will get back once I've finalized assembly.
For the 'Cohesive 3D Printer' I'm working on there will be a conveyor belt driven by a gear motor with an optical encoder on the output shaft. That way weight shouldn't be an issue for Y-axis movement.
For the 'Cohesive 3D Printer' I'm working on there will be a conveyor belt driven by a gear motor with an optical encoder on the output shaft. That way weight shouldn't be an issue for Y-axis movement.
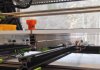
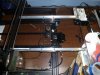
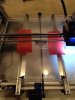
I replaced the bed with 1/4" sand blasted glass. Works like a charm. Just make sure to set the acceleration to 300mm/s^2
I also strengthend the y gantry with an aluminum plate. this gave it the stability it needed to reach higher speeds.
I can now do multiple prints with minimal or no bed leveling!
I also strengthend the y gantry with an aluminum plate. this gave it the stability it needed to reach higher speeds.
I can now do multiple prints with minimal or no bed leveling!
Attachments
-
 170.4 KB Views: 3,078
 -
 116.1 KB Views: 3,078
 -
 106 KB Views: 3,078
We originally had (4) of the 1/2" x 1/2" aluminum angles for each kit. (2) were for below the bed and (2) were used to connect to the y-axis acrylic plate. Two of these were removed (the ones just below the bed) since it was thought they were useless but it turns out they did remove the bed sag. If you can get a hold of these angles (at any home depot etc) and drill out the end holes they will eliminate the sag.
Hi everyone.
So I got my hands on an 18x18 piece of 1/4" aluminum. It weights the same as tempered glass, but it's easier to mill holes into. I'm planning on putting a 1/16" piece of acrylic on top with binder clips, but I'm concerned about the inertia (from weight) of the assembly weight causing the Y axis to skip or slip.
Has anyone who replaced the bed with 1/4" tempered glass had problems with skipping?
I'm planning on turning down acceleration to 300, having said that, what speeds has everyone been printing at?
I'm going back and fourth if I should return the aluminum for a thinner piece and pay a restocking fee, or if I should go with the stout 1/4" plate.
Thoughts?