DonHanson said:
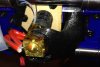
I got the metal bits unscrewed from the black plastic tube but am unable to extract the nozzle or threaded rod from the heater block. (ignore nozzle on left, from different 3D printer)
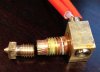
I suppose the right way to prep for cleaning would be to uncover/find the tension screw holding the heat element in the heater block to get down to metal pieces for propane torching/cleaning.
Should these pieces come out of heater block?
Is there better way to clear clogged nozzle?
Thanks
I was hoping to get a write-up about clearing a clogged nozzle soon we've just been swamped. I plan on adding images or making a video to demonstrate this process. After many tests, the easiest way for us to clean the nozzle is the following:
Note: In some cases you can simply clean the tip without removing the hotend so try that first since it only takes a few seconds. It's step #4 below.
1. Remove the two screws you mentioned and as seen in this post
http://www.gmaxprinter.com/forum/viewtopic.php?f=12&t=7
2. Pull off the nozzle/basswood assembly but don't unplug it.
3. Using the LCD screen go to "Control > Temperature > Nozzle" and set it to around 195. BE VERY CAREFUL NOT TO TOUCH THE HOTEND. The basswood end should be cool to the touch. Use "helping hands" to hold the hotend.
4. Using a piece of wire or a piece of miniature piano wire (smaller than the diameter of the nozzle which is either 0.5mm or 0.35mm) insert it in to the tip of the nozzle. We used this for our 0.5mm nozzle
http://www.amazon.com/gp/product/B0013891I0/ref=wms_ohs_product?ie=UTF8&psc=1. This will unclog the tip.
5. Using a piece of wire or steel rod (
http://www.mcmaster.com/#1257k19/=rksail) push out what you can from the top of the hotend.
6. Cut about 12" of PLA from your spool and feed it from the top of the hotend for about 1 second. Pull it out and cut off the melted part. Reinsert it in the hotend pull out and cut the melted part. Repeat this step several times. The point is to melt the end of the filament and have it "pull" out any glassified filament which is already in the tip.
Basically repeat steps 4-6 until the hotend is clear and filament easily pushes through. I've found this can take anywhere from a single try up to 10 minutes but it seems to be quite effective.
 234.9 KB Views: 3,504