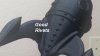
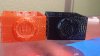
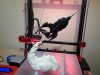
Here are some pix of the gCreate Spaceship I printed yesterday and the settings I used for each piece. This was the largest print I've completed so far. Overall, I'm pleased since the intent is to finish the model off with paint giving it a distressed aluminum look ; detailing the rivets, portholes and rocket boosters.
The print quality does spawn some questions though.
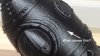
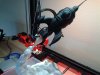
It looks like there may be layer shifting around the portal windows but not ABOVE the portals. The problem seems to have corrected itself (see pix). I'm not sure if that's a printer issue or a Slic3r issue. Another forum member had a similar problem and posted the same issue on another thread. He indicated he switched to Simplify3D but the problem didn't go away. This was several months ago and both Simplify3D and the gMax have been updated . I am unsure of the cause and how to fix it. The Simplify3D website says they support gMax printers. This might be a recent addition to their site since it lists the XT as a supported printer - Another member mentioned Simplify3D to Gordon and urged him to get the gMax config to them. I mention all of this since there is no trial for Simplify3D and I would gladly spend the money if I knew it was a slicing engine problem. At this point, I am trying to understand why this is happening.
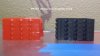
Seam alignment was random so I am unsure what blobs are layer changes and what can be fixed by additional tweaks.
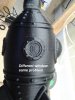
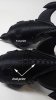
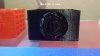
There is also artifacting to the right of the entire column of rivets in one of the photos. This only occurred on one face. Another face of the rocket the rivets didn't have the issue.
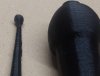
Last issue was the upper portion of the antennae (see pic). Not sure how to address that. (hotend, bed, slic3r) The "knob" and portion below is not the same quality as the rest of the piece.
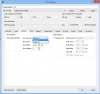
I was not going for super high quality. Everything was based on medium quality and tweaked from there. Again, the intent was to finish it off with paint. Using the latest Marlin firmware for XT and gMax Slic3r config bundle as of this post, the only slicer settings that were tweaked were perimeters, infill, layer height and perimeter speed. (see below).
All parts scaled @ 100%
Spaceship Main
Perimeters 3 (2 is recommended - the rocket has some heft to it)
Infill: 20% (could probably go a little lower - unless you plan to fly in it).
Layer height .25 (small tweak)
First layer height .28mm
Perimeter speed: 45% <-------- 50% is ok too (and faster)
No support, brim or tall skirt.
Print time: 9 hours 16 minutes
Notes: This took some time to remove from the bed - It was really stuck. I was concerned about breaking one of the little rocket boosters with the putty knife so I chipped away at each one lightly until I could get a small corner of the knife under the booster. This took a couple of minutes on each one. (Be patient - 2 minutes is way better than having to print another one for 9 hours+. Then with light pressure, I was able to pry them loose). The main booster released from the bed by grabbing the body of the spaceship and lightly torquing it off. Areas of the main spaceship printed better than others. - vertical faces on the fin arches connecting to the body (really nice). Main body contour (some areas not as good).
Spaceship Top:
Perimeters: 2 (I printed the spaceship first and after feeling how hefty it was I settled on 2 for the rest of the parts)
Infill: 20%
Layer height .25 (small tweak)
First layer height .28mm
Perimeter speed: 45%
No support, brim or tall skirt.
Print time: Approx 1 hour 30 minutes
Notes: You'll need to sand down the "peg" of the Spaceship top so it can seat fully onto the Spaceship. Be careful when handling. The antennae is fragile and I broke it off while sanding. No worries, I just printed another.")
Flame
Perimeters: 2
Infill: 20%
Layer height .25 (small tweak)
First layer height .28mm
Perimeter speed: 45%
Print time: Approx 1 hour 40 minutes
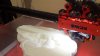
Smoke
Perimeters: 2
Infill: 18% (this would have been really heavy with a higher number. It feels very strong at 18% not to mention a faster print & less filament - could probably go less for the main smoke body but I am not sure how strong the "stem" part would be. After I snapped the antennae , I was a little more cautious)
Layer height .30mm (small tweak)
First layer height .28mm
Perimeter speed: 70% (ramped this up for increased turbulence look and shorter print time)
Print time: Approx 11 hours 35 minutes
Notes: I increased the layer height for a couple of reasons. 1) Time and filament 2) I thought the added roughness would increase the turbulent look of the smoke. It was definitely faster, but you can tell the difference in layer height when looking close. I'm happy with the way it printed but I wanted to point that out. From a few feet away you can't tell. The whole smoke piece released from the bed very easily. A couple of pokes from the the putty knife and a it pried off with minimal pressure. No warping at all along the edges on the large, flat bottom.
I still have a few tweaks and a ton to learn but I feel the printer is now ready to start printing prototypical products and provide solutions to our clients - It's intended purpose. - There is no doubt this printer will pay for itself in short order So that just leaves the learning curve - any insight on the print issues is appreciated.
Cheers,
Larry
The forum only allows 3 attachments per post. Pix of print problems to follow.....
The print quality does spawn some questions though.
It looks like there may be layer shifting around the portal windows but not ABOVE the portals. The problem seems to have corrected itself (see pix). I'm not sure if that's a printer issue or a Slic3r issue. Another forum member had a similar problem and posted the same issue on another thread. He indicated he switched to Simplify3D but the problem didn't go away. This was several months ago and both Simplify3D and the gMax have been updated . I am unsure of the cause and how to fix it. The Simplify3D website says they support gMax printers. This might be a recent addition to their site since it lists the XT as a supported printer - Another member mentioned Simplify3D to Gordon and urged him to get the gMax config to them. I mention all of this since there is no trial for Simplify3D and I would gladly spend the money if I knew it was a slicing engine problem. At this point, I am trying to understand why this is happening.
Seam alignment was random so I am unsure what blobs are layer changes and what can be fixed by additional tweaks.
There is also artifacting to the right of the entire column of rivets in one of the photos. This only occurred on one face. Another face of the rocket the rivets didn't have the issue.
Last issue was the upper portion of the antennae (see pic). Not sure how to address that. (hotend, bed, slic3r) The "knob" and portion below is not the same quality as the rest of the piece.
I was not going for super high quality. Everything was based on medium quality and tweaked from there. Again, the intent was to finish it off with paint. Using the latest Marlin firmware for XT and gMax Slic3r config bundle as of this post, the only slicer settings that were tweaked were perimeters, infill, layer height and perimeter speed. (see below).
All parts scaled @ 100%
Spaceship Main
Perimeters 3 (2 is recommended - the rocket has some heft to it)
Infill: 20% (could probably go a little lower - unless you plan to fly in it).
Layer height .25 (small tweak)
First layer height .28mm
Perimeter speed: 45% <-------- 50% is ok too (and faster)
No support, brim or tall skirt.
Print time: 9 hours 16 minutes
Notes: This took some time to remove from the bed - It was really stuck. I was concerned about breaking one of the little rocket boosters with the putty knife so I chipped away at each one lightly until I could get a small corner of the knife under the booster. This took a couple of minutes on each one. (Be patient - 2 minutes is way better than having to print another one for 9 hours+. Then with light pressure, I was able to pry them loose). The main booster released from the bed by grabbing the body of the spaceship and lightly torquing it off. Areas of the main spaceship printed better than others. - vertical faces on the fin arches connecting to the body (really nice). Main body contour (some areas not as good).
Spaceship Top:
Perimeters: 2 (I printed the spaceship first and after feeling how hefty it was I settled on 2 for the rest of the parts)
Infill: 20%
Layer height .25 (small tweak)
First layer height .28mm
Perimeter speed: 45%
No support, brim or tall skirt.
Print time: Approx 1 hour 30 minutes
Notes: You'll need to sand down the "peg" of the Spaceship top so it can seat fully onto the Spaceship. Be careful when handling. The antennae is fragile and I broke it off while sanding. No worries, I just printed another.
Flame
Perimeters: 2
Infill: 20%
Layer height .25 (small tweak)
First layer height .28mm
Perimeter speed: 45%
Print time: Approx 1 hour 40 minutes
Smoke
Perimeters: 2
Infill: 18% (this would have been really heavy with a higher number. It feels very strong at 18% not to mention a faster print & less filament - could probably go less for the main smoke body but I am not sure how strong the "stem" part would be. After I snapped the antennae , I was a little more cautious)
Layer height .30mm (small tweak)
First layer height .28mm
Perimeter speed: 70% (ramped this up for increased turbulence look and shorter print time)
Print time: Approx 11 hours 35 minutes
Notes: I increased the layer height for a couple of reasons. 1) Time and filament 2) I thought the added roughness would increase the turbulent look of the smoke. It was definitely faster, but you can tell the difference in layer height when looking close. I'm happy with the way it printed but I wanted to point that out. From a few feet away you can't tell. The whole smoke piece released from the bed very easily. A couple of pokes from the the putty knife and a it pried off with minimal pressure. No warping at all along the edges on the large, flat bottom.
I still have a few tweaks and a ton to learn but I feel the printer is now ready to start printing prototypical products and provide solutions to our clients - It's intended purpose. - There is no doubt this printer will pay for itself in short order
So that just leaves the learning curve - any insight on the print issues is appreciated.Cheers,
Larry
The forum only allows 3 attachments per post. Pix of print problems to follow.....
Attachments
-
 352.5 KB Views: 2,614
 -
 370.4 KB Views: 2,613
 -
 171.7 KB Views: 2,612