Hey Julia,
Sorry for the long delay in response. Yes that was my attempt at improving the platten.The thinking was to keep the acyrlic build surface and to increase the stiffness without increasing mass. The egg crate is a 2 x 4 lighting grate made of styrene that I got at Home Depot along with .093 thick acryilic sheet. I thought I'd get clever and solvent bond the two together. I used a sheet of glass as a build surface, put the acrylic sheet on it, flood it with acetone dropped the grate on, weighted it down and let the acetone evaporate.That worked good for the bond but over 3 or 4 days it shrank enough to crown it besides that it wasn't stiff enough. So to salvage the panel I epoxied another sheet of acrylic to the other side.This really stiffen it up and that's the platten you see in the first post. It's not as flat as I want but it is very close so I'm going to try block sanding it.
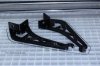
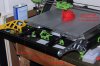
While watching it print I noticed the edge of the platten vibrating in the z direction. Putting pressure on the corner I could see the acyrlic carraige flexing. In the pics below is my fix both versions 1 and 2 and how they came about. I used a sabre saw and a hand drill to build it, materials came from Home Depot.
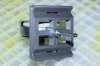
In version 1 I used 1/4 acrylic and sawed it into an H shape, epoxied the alum angle onto it and located the wheels 13 inches apart. Purchased new rails from openbuildspartstore.com, cut to 32 inches drill and install.This removed all flexing and provide a solid base to mount the platten. Now I'm using the original 1/4 acrylic platten with 1/2 by 3/4 angle epoxied to the front and back and supported by an additional spring in the center. In the version 1 pic you can see a number of shims to acheive flatness.
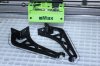
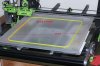
While this was working ok I wasn't satisfied because the platten was not centered so I made version 2 with improvements. Now it's centered, I can print over the full 410 x 410 area. Just installed this version yesterday and I'm still tweaking it in.
I always thought there should be a quard in front and with the extended rails it just looks right and was able to repurpose the original rail.
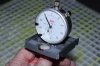
The indicator is a very handy tool to have, it shows how much your off, allows you to split the difference and watch the dial as you make the changes.