Tightening or Replacing Belts
The gMax printer uses 6mm wide GT2 fiber reinforced timing belts. Use the guide below to replace or tighten the belts. Do not use metal reinforced belts as the tight radius of the pulleys will weaken the metal fibers over time causing the belt to break.
X-Axis Belts
The gMax 2 Pro was designed so the x-axis belt will remain in-place even if you swap extruders. A metal plate is bolted to the x-axis linear block and the belts are attached to either end. You do not need to remove the extruder to replace or tighten the belts.
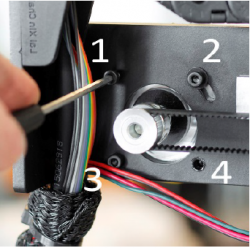
1. On the x-axis motor, remove two of the bolts (#1 and #4).
2. Loosen the other two bolts (#2 and #3). This will allow the motor to swing down and loosen the belt.
3. If you’re installing a new belt, connect it to the right side of the extruder plate with cable ties, then loop it around the right-side pulley, around the motor on the left side and connect it to the left side of the belt plate. The belt should be tight enough that it’s not sagging.
4. Once everything is connected rotate the x-axis motor back up to tension the belt and reinstall the bolts.
Y-Axis Belt
The y-axis belt clamp is secured underneath the bed frame. We must access the bottom of the printer to adjust the belt tension. To do this turn the printer on its back. You will find it useful to use a box to rest the printer frame on. A filament box is the perfect size. As you lift, the bed will want to roll backwards. Be sure to hold it while turning the printer on its back. Do not remove the bed carriage from the linear guide rails.
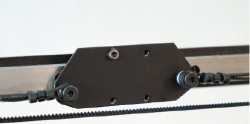
1. With access to the bottom of the printer, loosen the aluminum bracket from the aluminum extrusion. So it has a few millimeters of wiggle room.
2. Loosen the double t-nut that is pressed against the belt on the back of the plate.
3. Insert the new belt or tighten the belt by a tooth or two if you are just tightening the belt.
4. Then tighten down on the double t nut to clamp the belt in place. The belt should not be tight at this point because the aluminum bracket is loose.
5. Tighten the aluminum bracket back down. Tightening down on the aluminum bracket will pull the belt tight.