Up until the point of adding the z-axis rods everything went exactly like the guide specified. Once I got to the z-axis, that was definitely where I spent the longest time. The only way I could get the z-axis rod vertical was to "hover" the aluminum extrusion gusset and rely on the plastic plates to hold everything in place and keep it steady, which I really didn't like. I don't know if anyone else had this issue. But, I had to move the bottom z-axis bracket so far forward that I couldn't get the gusset seated against the other extrusions. My solution was to move the lower gusset plate to the inside. There's just enough room as long as your bed is centered and parallel. This way I got the gusset corners to bite into the upper and lower extrusion and make it a very solid frame. On the PSU side, I flipped the plate to make room for the PSU bracket.
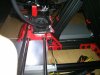
I also slotted the mounting holes into the extrusion for the PSU bracket up and down. I had to lower it because the PSU was hitting the y-axis rails.
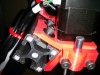
Finally, I altered the upper z-axis bracket quite a bit.
-The face of the motor was larger than the face of the bracket so it didn't fit flat on the face of the bracket. The back edge of the motor was starting to ride up the angled portion. I ground away a couple mm at the corner to make room for the motor.
-I also had to take one of my hex wrenches and chop the short end shorter to actually fit next to the motor to tighten the bolts on the angle. (the chopped off wrench also helped me tighten the bolts for the electronics enclosure)
-The slotted holes to mount the motors weren't centered on the actual pattern so I had to open up the slots.
-I could only get maybe 1 thread of the tiny screws into the motor, so I also ground down the face where the bolts were to make it thinner. I got maybe 2 threads into it and called it good.
Once everything was completely assembled the machine wasn't turning on. I searched all over to make sure everything was connected properly. I finally got out my multimeter and started to check my outlet, the PSU, the connectors and everything was fine. I went online to verify that the jumper on the PSU was in the right spot, which it was. But as I went to fiddle with the jumper, the machine quickly turned on then off. I finally realized that the pin in the 24 pin connector got pushed out the back when the jumper was installed. I shoved it back in and reinserted the jumper and voila!
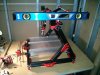
This was still a fun build, but I agree with other comments that it might not be the best option for first-timers. I'm just waiting on a new cable for the extruder motor because mine was shipped with the wrong end connector.
I hope this was helpful to others.
I also slotted the mounting holes into the extrusion for the PSU bracket up and down. I had to lower it because the PSU was hitting the y-axis rails.
Finally, I altered the upper z-axis bracket quite a bit.
-The face of the motor was larger than the face of the bracket so it didn't fit flat on the face of the bracket. The back edge of the motor was starting to ride up the angled portion. I ground away a couple mm at the corner to make room for the motor.
-I also had to take one of my hex wrenches and chop the short end shorter to actually fit next to the motor to tighten the bolts on the angle. (the chopped off wrench also helped me tighten the bolts for the electronics enclosure)
-The slotted holes to mount the motors weren't centered on the actual pattern so I had to open up the slots.
-I could only get maybe 1 thread of the tiny screws into the motor, so I also ground down the face where the bolts were to make it thinner. I got maybe 2 threads into it and called it good.
Once everything was completely assembled the machine wasn't turning on. I searched all over to make sure everything was connected properly. I finally got out my multimeter and started to check my outlet, the PSU, the connectors and everything was fine. I went online to verify that the jumper on the PSU was in the right spot, which it was. But as I went to fiddle with the jumper, the machine quickly turned on then off. I finally realized that the pin in the 24 pin connector got pushed out the back when the jumper was installed. I shoved it back in and reinserted the jumper and voila!
This was still a fun build, but I agree with other comments that it might not be the best option for first-timers. I'm just waiting on a new cable for the extruder motor because mine was shipped with the wrong end connector.
I hope this was helpful to others.
Attachments
-
 118.7 KB Views: 2,671
 -
 99.2 KB Views: 2,672
 -
 117.2 KB Views: 2,672