So I decided to switch my acrylic bed out to a glass one. Mainly because:
1. It was really hard to get the PLA off the acrylic bed. Next time I'll just use painter tape.
2. Sagging on the sides. I had a few ideas but none that would work with those L-Channels.
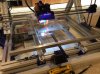
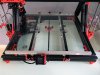
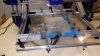
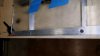
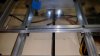
I choose 1/8" glass (also known as DS glass) from True Value Hardware. Definitely a better choice than single strength and weighs noticeably less than 3/16". I also switched out the L-channel with C-channel from Home Depot. I feel like the sides of the C-channel makes them more sturdy. I used 18" lengths for the bottom railings as well as the glass framing.
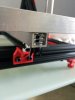
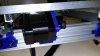
I like the result. I think it looks clean, although that won't matter once the heat bed is installed. To connect the C-channels, I got some smaller M4 bolts and also used hex nuts and washers to tighten them onto the C-channel so I wouldn't have issues when calibrating. I left everything else the same, except took a plastic pipe cutter to the butterfly ends of the nut to turn Mickey Mouse into a sleeping Batman. Those butterfly ears made it impossible to calibrate. But now it's not a problem and with the hex nuts holding the bolts in place. It doesn't move on me like it used to.
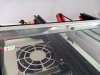
To keep the glass in place I used some picture frame spring clips. That kept the glass away from the end bolt, and pressed it to the top of the C-channel. I did 3 on each side just to be safe.
Because this is glass, I don't need to put a frame on the sides. No sagging with glass. My future plan is to take an 18x18 Monster Board heat bed and place it below the glass. I'll use the spring clips below the heat bed on the frame to sandwich it to the glass. And I'll add four spring clips on the railings, to add pressure spaced evenly around the center of the board. I placed those in the top photos to give an idea of where they would be located.
I hope this helps someone else with their mods!
Justin
1. It was really hard to get the PLA off the acrylic bed. Next time I'll just use painter tape.
2. Sagging on the sides. I had a few ideas but none that would work with those L-Channels.
I choose 1/8" glass (also known as DS glass) from True Value Hardware. Definitely a better choice than single strength and weighs noticeably less than 3/16". I also switched out the L-channel with C-channel from Home Depot. I feel like the sides of the C-channel makes them more sturdy. I used 18" lengths for the bottom railings as well as the glass framing.
I like the result. I think it looks clean, although that won't matter once the heat bed is installed. To connect the C-channels, I got some smaller M4 bolts and also used hex nuts and washers to tighten them onto the C-channel so I wouldn't have issues when calibrating. I left everything else the same, except took a plastic pipe cutter to the butterfly ends of the nut to turn Mickey Mouse into a sleeping Batman. Those butterfly ears made it impossible to calibrate. But now it's not a problem and with the hex nuts holding the bolts in place. It doesn't move on me like it used to.
To keep the glass in place I used some picture frame spring clips. That kept the glass away from the end bolt, and pressed it to the top of the C-channel. I did 3 on each side just to be safe.
Because this is glass, I don't need to put a frame on the sides. No sagging with glass. My future plan is to take an 18x18 Monster Board heat bed and place it below the glass. I'll use the spring clips below the heat bed on the frame to sandwich it to the glass. And I'll add four spring clips on the railings, to add pressure spaced evenly around the center of the board. I placed those in the top photos to give an idea of where they would be located.
I hope this helps someone else with their mods!
Justin
Attachments
-
 104.9 KB Views: 4,213
 -
 140 KB Views: 4,213
 -
 127.6 KB Views: 4,213


")