Hello All,
I just got my gMax 1.5 XT with dual extruders built and performed my first test print. I am using Repetier-Host V1.0.6 with Slic3r 1.1.7 and loaded the gMax 1.1.7 Slic3r config files. I printed a square box 50.8mm x 50.8mm x 50.8mm. The box has a 1.5mm wall thickness. It is 3 times my .35mm hotend nozzle size. The front facing wall of the box has blemishes but also has really good quality in between. Anyone have this issue and found a fix. The back facing wall is perfect with absolutely no blemishes. The right facing wall was just about perfect as well with 3 small blemishes. I used the colorFabb PLA black that came with the printer. The hotend temp was set for the default PLA in slicer of 208c. When printing the temp went as low as 205c and would swing to 210c. It seems to swing 3c above or below 208c. Is this normal? I would not think this would be the issue. Thought maybe if the bed is not completely level this could happen? What if the left front corner of the bed was a little higher? I leveled the bed as good as can be so it should have been level. I also would observe the blemishes when they were happening on the front facing wall. The extruder would be moving along and a blemish would happen in the middle of a straight line. The extruder would not stop or pause or move from the straight line until it got to the corner. I did notice that when it printed the outside layer that it went half of the speed of the inside layers. Also the inside walls all look really good like the outside back wall. Thanks in advanced")
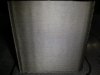
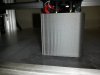
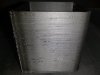
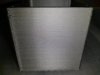
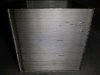
I just got my gMax 1.5 XT with dual extruders built and performed my first test print. I am using Repetier-Host V1.0.6 with Slic3r 1.1.7 and loaded the gMax 1.1.7 Slic3r config files. I printed a square box 50.8mm x 50.8mm x 50.8mm. The box has a 1.5mm wall thickness. It is 3 times my .35mm hotend nozzle size. The front facing wall of the box has blemishes but also has really good quality in between. Anyone have this issue and found a fix. The back facing wall is perfect with absolutely no blemishes. The right facing wall was just about perfect as well with 3 small blemishes. I used the colorFabb PLA black that came with the printer. The hotend temp was set for the default PLA in slicer of 208c. When printing the temp went as low as 205c and would swing to 210c. It seems to swing 3c above or below 208c. Is this normal? I would not think this would be the issue. Thought maybe if the bed is not completely level this could happen? What if the left front corner of the bed was a little higher? I leveled the bed as good as can be so it should have been level. I also would observe the blemishes when they were happening on the front facing wall. The extruder would be moving along and a blemish would happen in the middle of a straight line. The extruder would not stop or pause or move from the straight line until it got to the corner. I did notice that when it printed the outside layer that it went half of the speed of the inside layers. Also the inside walls all look really good like the outside back wall. Thanks in advanced
Attachments
-
 94.2 KB Views: 3,597
 -
 92.9 KB Views: 3,597
 -
 95.6 KB Views: 3,597