raykholo said:
One quick add since I'm the guy advocating Repetier-host:
You might be having issues getting the printer talking to the computer/ program.
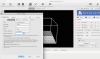
Go into "Printer Settings", a button in the upper right corner. In the Port row, press 'Refresh Ports' and then select COM# from the drop down. # should be small like 1 - 4.
Then make sure Reset on Connect is "DTR low>high>low.
So i kinda got it working thanks to @Raykholo and @RPz376....but im 100% sure its not working the way it should.
First...@Raykholo I tried to follow the directions above that you gave but the Repetier Host that I have for some reason doesn't have some of the things such as Port row, refresh ports, COM# ect. Though somehow it does seem to connect becuz it says "Connected" in green. But i still haven't gotten Repetier to work/control the printer. For now im using Slic3r alone but eventually it would be nice to control it with my Macbook instead of just using the SD card.
Next...@RPz376 thanks to your directions i was able to feed the extruder and got the SD card to read and because of that...i got it to try to print. However I did try to download the drivers you described but I wasnt sure which driver to download since there was more than one option.
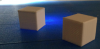
The problem I'm having now is a layer shift. At first I was having a problem with the y-axis shifting during the print. This turned out to be too much power going to the motor once i turned that down a bit it began to print properly somewhat. The BIG problem is that once it reaches a certain height it begins to shift back and forth like a deck of cards...I don't think its the same problem that i was having with the motor becuz to start out it prints fine until it hits around a half a inch in height.
DOES ANYONE KNOW HOW TO FIX THIS???????
WE DO NEED some kind of formal instructions or a video showing how to opperate the printer because unless you have some prior knowledge of 3d printing were left stranded and it would be nice to not just build the printer but to actually print something to get going.
Thank to @Raykholo and @RPz376 for the help you've provided so far. Any additional help and instructions anyone can/willing to provide to your fellow Gmax-ers is VERY MUCH APPRECIATED!

To @Don Bedwell and everyone else wanting some kind of guidance to get your expensive piece of machinery going...the following is how I got my printer printing.
00. You need to feed the extruder the filament. Preheat the extruder by going Prepare> Preheat PLA or ABS which ever your using. Press down the spring arm on the extruder and feed the filament through hole on the spring arm, between the feed wheels and down the cylinder. Since its preheated when feeding the filament it may come out through the extruder.
1. Your going to need something to print. So to achieve this you can create an object with a 3d design software such as Sketch Up,Auto Cad, Blender ect. (there are many more which can be found here
http://www.3ders.org/3d-software/3d-software-list.html) or you can go the easy route and download a 3d object from
http://www.thingiverse.com
2. Once you have your 3d object, your going to need to slice it up. This is going to require a program like Slic3r which can be downloaded here
http://slic3r.org/
3. Now that you have downloaded and installed Slic3r. Open it and you should see a grid that say "Drag your objects here"... Drag and drop the 3d object you created or downloaded which should be a .STL file.
You should see your object that you've brought in, at an birds eye view.
4. Before you do anything else you NEED to set the configurations for your printer. Those can be found in the manual or downloaded from the download page on the gmax site
http://www.gmaxprinter.com/?page_id=146 (find and install the latest slic3r configurations) If your going off of your build manual you need to type in manually in the "Print Settings, Filament Settings, Printer Settings". If you download the configurations (which is the easiest route) go to File>Load Config...locate the download configurations which may have to be unzipped. Then choose to open the configurations that best describes the printer you have.
5. Once you have all the configurations set you can now choose to Export Gcode. Connect the SD card to your computer and save the Gcode file to the SD card. *I didn't the Gcode into a folder.*
6. Take the SD card place it into the side of the LCD screen on the printer connections facing up. When inserted corrected the LCD should say "Card Inserted" Press the button on the LCD (may be an actual button or you may just need to gently press the turn nob depending on which printer you have) Once in the menu Scroll down by turning the nob and you should see Print from SD (if you don't try taking out the card and reinserting it or turning your printer on and off) Select Print from SD and then select the file of the object you want to print.
7. Once the file is selected the printer should begin homing and the LCD screen will say "Heating" when its finished heating it will begin to print!