Description:
Infill is one of the main portions of 3d printing. Modifying infill can increase strength, speed up printing or result in unique designs. This article will go over several of the main features of infill.
Difficulty Level:
Beginner / Introduction
Difficulty Level:
Beginner / Introduction
What is Infill?
Simplify3D Infill Examples
By modifying the infill, you can increase the strength of a part, increase print speed or even generate very interesting designs. Changing infill to fit your desired results is very important part of the slicing process.
Watertight vs Non-Watertight 3D Models
In order for a slicing program to work properly, you must feed it a clean model most of the time. Here are two examples of models that look similar to us, but the slicing engines see them very differently. Even though they appear solid, when you look inside they may not be.
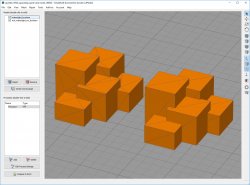
Left: Solid model, Right: Intersecting faces
When you attempt to slice these models, the result has many gaps and voids. Make sure your model is solid, and does not have intersecting faces.
You can sometimes use programs such as www.makeprintable.com to fix problems with your model.
Infill Styles Depend on your Slicing Engine
Modifying support can greatly increase print speed or print strength and you should experiment with different types to see the results.
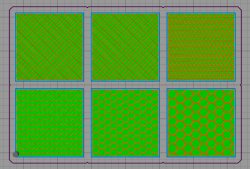
Simplify3D Infill Patterns
Various slicing engines offer different infill types. Some are cosmetic while some are for strength or necessity. Many slicing engines have similar infill styles and the most common are: Rectilinear, Grid, Triangular and Honeycomb
Additionally, more infill types can be found in certain programs like 3d Honeycomb, Octagram Spiral and even variable infill density.
Tips on Infill
Typically the “denser” the infill the stronger the part but this isn’t always true. Sometimes you can use other methods to increase strength. Each slicing program has different settings to modify infill.
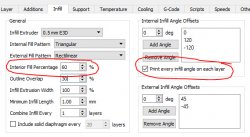
Note: With this setting on, the infill is calculated differently. For triangular 100% infill will look more like 33% infill since it is 3x as dense.
How Dense Should My Infill Be?
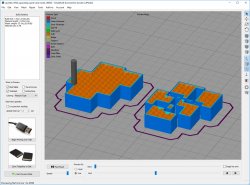
Infill density really depends on the model and your desired results. In most cases you must have some infill turned on to support the model while printing. Think of infill as the interior scaffold to support the top of your model.
As we move up in layers, you can see large portions of the model are printing in air. This will almost certainly result in a poor quality print if not a failed print. The solution in this instance would be to increase your infill density or change your model.
Usually a density value between 10% and 30% is sufficient for most models unless you want them stronger. The top limit is usually 95% or else the model will print too thick.
A good rule of thumb is to increase your "top layer count" as you decrease "infill density" to ensure the top layer prints without gaps. If your model has large flat areas, or areas with a curved top you may need to increase the infill or the top layers will print poorly.
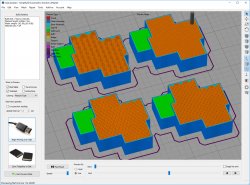
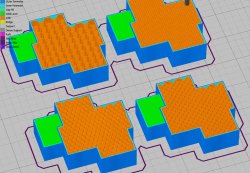
3 Examples of the same model with different infill settings.
Left Print:
Infill: 4%, Top Layer Count: 2, Layer Thickness: 0.2mm
Infill and top layer count is too low. Print will have gaps on top surface and sloped surfaces have nothing to print on
Middle print
Infill: 4%, Top Layer Count: 5, Layer Thickness: 0.2mm
Top layer count is good and will result in a nice top surface for the flat area however the infill density is still too low. The sloped surface in the back still has too little infill to print on.
Right print
Infill: 10%, Top Layer Count: 3, Layer Thickness: 0.2mm
Top layer count is good and will result in a nice top surface and the infill density is sufficient. The sloped surface in the back has plenty of infill to print on.
Models with No Infill
In some cases models have been designed where the infill must be turned off such as the gCreate bonsai planter.

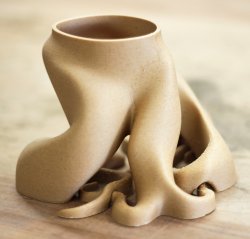
Bonsai Planter printed with no infill
If you download the file you will see one version of the model is solid. You must set infill to zero or else the model will not print hollow. This is useful since the exterior walls will be calculated based on your scale / nozzle size rather than geometry making it much easier to print on a wide range of printers.
When printing the bonsai model model make sure to:
- Increase Perimeter count to 4 or 5
- Set infill to 0%
- Review your gcode prior to printing
- Turn off the printer prior to the top of the model being printed or use multiple processes in Simplify3D to turn off top layer. If you don't do this the model will have a solid top.
More information
This is article is just a general overview of infill and why you need it.
Look for more articles in the future on advanced infill techniques including spiral vase mode, creative uses for infill and ways to further modify infill to your advantage.
Attachments
-
 250.3 KB Views: 1,908
Last edited: