Snap Together RC Hex Copter!

#1
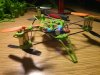
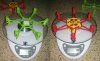
I had recently gotten a smart phone bluetooth controlled hex-copter from another KickStarter project. With my inexperience flying these things, over-sensitive controls, thin low-infill 3D printed stock frame, unfortunately I kept breaking my frame =(. So the engineer in me took flight and I decided I could make a better frame (at least I thought I could)! I tried printing entire frames at once as a single print, but the necessity to keep the frame light with thin walls, every few "wall nudges" and "turbulent landings" I'd crack the frame along the layers, just like the stock frame.

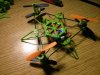
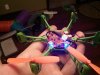
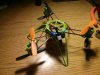
Then I thought that I might be able to print the pieces individually in the strongest way I could. I printed each motor housing one by one to get better layer adhesion, so it wasn't jumping to each housing letting the first one cool, which was also causing a ton of stringing. I also laid the arms down flat, which made them incredibly stronger!

After many concepts, test prints and tolerance adjustments, I was able to print a very light, stiff, snap-together frame for my hex-style Flexbot!!!

Gordon might be interested because I noticed that he was also a backer.
BTW Gordon, have you gotten yours yet?

(also, v2.0 coming soon... It'll have carbon fiber arms!)
 

Attachments

#2
So... after a week of flying my Flexbot in it's new snap-together frame, I realized that the motor mounts weren't snapping together snug enough. After all of my bumps and crashes, to my surprise, nothing broke! But, the motors kept snapping off and becoming looser and looser. I finally broke an arm by dropping it from my hand... Then a second one broke as the copter went psycho upside down on my table because I closed the app on my phone! Developers fixed that dangerous bug though so it wont bite me in the future, thank god!

Digging through the open-source copter firmware, I saw a configuration for a "Y6" configuration. I decided to scrap my current design in favor of a 3-arm version. I thought that I could reduce more weight by having fewer arms (plus it looks cooler, imo). So off I went! I even decided that carbon fiber arms would be a nice touch! =)

I can achieve "stable" flight and hover, but it spins in a circle... So there's still some debugging to do. I'm not sure that the arms are all parallel to each other and perpendicular to the ground...
 

Attachments

#4
Ok, v3 is now operational! I got rid of the spinning issue from the last design. I'm sure it was because the arms weren't parallel and perpendicular.

This version sports a different approach to the carbon fiber arms. 3 arms mounted in a triangle that tie each motor pair together, instead of 2 parallel arms that mount independently to the center.
I got rid of all snap together parts because they were very unreliable for the forces that act upon the frame. Instead, I had some left over M1.6 x 3 screws that I used to fasten and clamp the parts in place.
Finally, I added some horns and a tail to the cover for aesthetics. Though, the horns kind of look like antennae...

The little guy flies decently. A little tougher to control than the original 6-arm version. But, it's a blast to design something and then have a physical version printed out minutes later!
 

Attachments

GORDON.LAPLANTE

Administrator
Staff member
#5
dreadful said:
So... after a week of flying my Flexbot in it's new snap-together frame, I realized that the motor mounts weren't snapping together snug enough. After all of my bumps and crashes, to my surprise, nothing broke! But, the motors kept snapping off and becoming looser and looser. I finally broke an arm by dropping it from my hand... Then a second one broke as the copter went psycho upside down on my table because I closed the app on my phone! Developers fixed that dangerous bug though so it wont bite me in the future, thank god!

Digging through the open-source copter firmware, I saw a configuration for a "Y6" configuration. I decided to scrap my current design in favor of a 3-arm version. I thought that I could reduce more weight by having fewer arms (plus it looks cooler, imo). So off I went! I even decided that carbon fiber arms would be a nice touch! =)

I can achieve "stable" flight and hover, but it spins in a circle... So there's still some debugging to do. I'm not sure that the arms are all parallel to each other and perpendicular to the ground...
Have you played with the app? I think you can adjust some settings in it to trim out the rotation. Love the new designs though. I haven't had any time to play with mine other than the first setup.
 
#6
GORDON.LAPLANTE said:
Have you played with the app? I think you can adjust some settings in it to trim out the rotation. Love the new designs though. I haven't had any time to play with mine other than the first setup.
As far as I can tell, the app will only trim the accelerometer front, back, left, right. The onboard magnetometer should keep it pointing one direction and keep it from spinning, but I believe it's disabled because the magnets in the motors are far too close to it. When I hook the copter up to the MultiWii debugger, it will show you where it thinks north is. As you spin it around, the needle kind of goes crazy. The latest triangular design eliminated my spin, which is why I'm convinced that my spinning was due to misaligned motors.

My new Y6v3.0 will be out soon, hopefully by the end of next week. I decided to order v3.0 from Shapeways since I'm more confident of my design and they use laser sintered nylon. It should be stronger and lighter, possibly more accurate also.

I got my gMax a little before the Flexbot, so it was perfect timing to get acquainted with the printer and then start building something "useful". (kuddos on beating their schedule with not nearly the amount of issues! Of course, they had over 4600 people to try and appease.)